This is the third and final lesson (and video lesson) of a three part ukulele fingerpicking blues lesson series. If you missed it, be sure to check out part 1 and part 2.
Just a couple days ago, we learned a fingerpicking pattern we can use for the 12-bar blues. In this lesson, we’re going to learn a second fingerpicking pattern. As much as these patterns can be used for the blues, they can also be used for other popular songs.
Video Lesson: Blues Fingerpicking Pattern #2
This is a video for this lesson showing you how to play the fingerpicking pattern in the 12-bar blues form as described below.
A Change In Fingerpicking Technique
In the previous lesson, we learned a fingerpicking pattern that used our thumb, index, and middle finger to pluck the strings. In this lesson, we’re going to learn a fingerpicking pattern that uses our thumb, index, middle, and ring finger.
For this pattern, our thumb will pluck the top string. Our index finger will pluck the second to top string. Our middle finger will pluck the second to bottom string, and our ring finger will pluck the bottom string.
As I mentioned in the previous lesson, in general, one technique is not necessarily better than the other–just different. It’s best to practice both ways because some patterns do lend themselves better to one technique over the other.
Ukulele Blues Fingerpicking Pattern #2
Again, we will be playing this pattern to a count of four. Each note in the pattern gets a length of an eighth note. The first chord we will be playing over is an A7 chord (click to see the fingering).
On the first beat, we are going to use our index finger to pluck the second to top string. On the “&” of the first beat, we are going to use our ring finger to pluck the bottom string.
On the second beat, we are going to use our middle finger to pluck the second to bottom string. On the “&” of the second beat, we are going to use our thumb to pluck the top string.
We will repeat this exact pattern for the third and fourth beats.
Blues Fingerpicking Pattern #1: A7 chord
-     I   R   M   T   I   R   M   T

a |-------0---------------0----------

e |-----------0---------------0------

c |---1---------------1--------------

g |---------------0---------------0--

-     1   &   2   &   3   &   4   &
As you can see, the pattern repeats over the third and fourth beats.
Blues Fingerpicking Pattern #1: D7 chord
-     I   R   M   T   I   R   M   T

a |-------3---------------3----------

e |-----------2---------------2------

c |---2---------------2--------------

g |---------------2---------------2--

-     1   &   2   &   3   &   4   &
Because we’re playing the 12-bar blues, let’s practice this pattern over a D7 chord too.
Blues Fingerpicking Pattern #1: E7 chord
-     I   R   M   T   I   R   M   T

a |-------2---------------2----------

e |-----------0---------------0------

c |---2---------------2--------------

g |---------------1---------------1--

-     1   &   2   &   3   &   4   &
And finally, let’s practice this pattern over an E7 chord.
Your Turn to Fingerpick the 12-Bar Blues
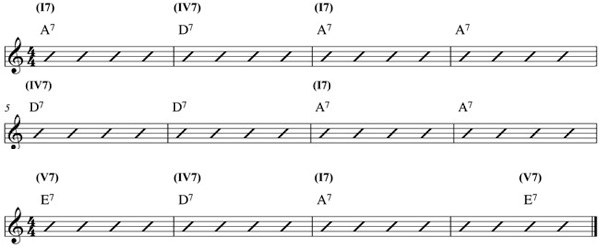
Once you get a feel for how the fingerpicking pattern goes with these chords, it’s time to play the 12-bar blues. Here is one example of the 12-bar blues.

If you’re wondering how I played the blues lick at the end of the 12-bar phrase, go to the previous lesson where I explain how to play it.
I Want To Hear From You
How’s the fingerpicking going? What types of patterns have you come up with?
If you’re having any difficulties, please post your questions and comments below. Something I’ve really enjoyed about Ukulele Tricks is all the participation that happens in the comments. It’s not uncommon for someone other than myself to post some helpful tips and give advice to those who have questions. For this, I thank you all!
Let me know how it’s going.

