This is the second post (and video lesson) of a three part ukulele fingerpicking blues lesson series. For the first lesson, I introduced the structure of the 12-bar blues. Get that lesson here. Once you’re ready, go to part 3.
Now that we’ve learned the 12-bar blues on ukulele, it’s time to learn a couple fingerpicking patterns that we can use with this form. These fingerpicking patterns are great if you are a beginner to fingerpicking, but they are just as useful if you want to get some new ideas.
Video Lesson: Blues Fingerpicking Pattern #1
This is a video for this lesson showing you how to play the fingerpicking pattern in the 12-bar blues form as described below.
Ukulele Fingerpicking Technique
There are two common ways to fingerpick on the ukulele.
The first way uses your thumb, index, and middle finger. Your thumb plucks either of the top two strings, your index finger plucks the second to bottom string, and your middle finger plucks the bottom string.
The second way uses your thumb, index, middle, and ring finger. Your thumb plucks the top string, your index finger plucks the second to top string, your middle finger plucks the second to bottom string, and your ring finger plucks the bottom string.
One technique is not necessarily better than the other. For example, I like to use the first way when I am doing patterns that have an alternating bass feel to them. For other patterns, I like to use the second way because each finger is assigned to a string. My thought is that I can do a lot more if I’m using four of my fingers versus three. I recommend practicing both ways.
For this lesson, we’ll be learning a fingerpicking pattern that uses the first way.
Ukulele Blues Fingerpicking Pattern #1
For this picking pattern, we are going to be playing to a count of four. The chord we will be playing over is an A7 chord (click to see the fingering).
On the first beat, we are going to use our thumb to pluck the C string on the 1st fret. On the “&” of the first beat, we are going to use our middle finger to pluck the bottom A string.
On the second beat, we are going to use our thumb again and pluck the top G string. On the “&” of the second beat, we are going to use our index finger to pluck the E string.
That’s our pattern. We repeat the pattern all the way through the third and fourth beats.
Blues Fingerpicking Pattern #1: A7 chord
-     T   M   T   I   T   M   T   I

a |-------0---------------0----------

e |---------------0---------------0--

c |---1---------------1--------------

g |-----------0---------------0------

-     1   &   2   &   3   &   4   &
We can play this pattern over any chord. Let’s practice it over a D7 chord.
Blues Fingerpicking Pattern #1: D7 chord
-     T   M   T   I   T   M   T   I

a |-------3---------------3----------

e |---------------2---------------2--

c |---2---------------2--------------

g |-----------2---------------2------

-     1   &   2   &   3   &   4   &
For our 12-bar blues progression, we also need to be able to play this pattern over an E7 chord.
Blues Fingerpicking Pattern #1: E7 chord
-     T   M   T   I   T   M   T   I

a |-------2---------------2----------

e |---------------0---------------0--

c |---2---------------2--------------

g |-----------1---------------1------

-     1   &   2   &   3   &   4   &
Be sure to watch the video lesson above to hear how this fingerpicking pattern is played.
Let’s Fingerpick the 12-Bar Blues
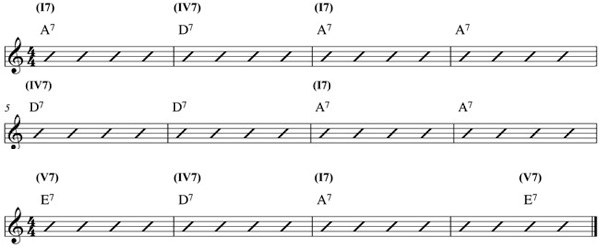
We can take this fingerpicking pattern and these chords and play the 12-bar blues progression. In the example of me playing in the video, I use this variation of the 12-bar blues:

Blues Lick & Turn Around
If you watched the video lesson above, you’ll notice that I add a blues lick on the second to last measure of the 12-bar phrase. It’s really easy to play.
On the first beat of the measure, I do a down strum on an A7 chord. On the second beat, I start into the lick. I count the lick in triplets through the second, third, and fourth beat.
For the second beat, with my thumb, I pluck the 2nd fret on the C string but quickly slide up to the 4th fret. On the “trip” of two, I pluck the 4th fret of the bottom A string with my middle finger, and on the “let” of the beat, I pluck the 4th fret of the C string with my thumb again.
I repeat this pattern for the third and fourth beats by walking down the frets. Be sure to watch the video lesson above to see and hear how I play this lick.
-         T   M      T    T   M      T    T   M      T

a |---0-------4---------------3---------------2----------

e |---0--------------------------------------------------

c |---1---2/4--------4----3----------3----2----------2---

g |---0--------------------------------------------------

-     1   2   trip - let  3   trip - let  4   trip - let
It’s Your Turn to Give It a Try
The best thing to do is to start off practicing this fingerpicking pattern over only one chord. If you’ve never fingerpicked before, it will take some practice to get your fingers used to the motion of fingerpicking. Go slow at first, and try to keep your timing as consistent and steady as possible.
As I mentioned in the video, you might want to plant the pinky of your fingerpicking hand on the top of the ukulele to stabilize your hand. Remember to be as relaxed as possible.
Once you get used to the pattern, try adding a chord change. Then, once you’re comfortable with that, you’re ready to play the 12-bar blues!
How’s the fingerpicking going for you? Do you have any questions? What tips do you have for those who are learning how to fingerpick?

