This is the first post (and video lesson) of a three part ukulele fingerpicking blues lesson series. Once you’re ready, go ahead to part two where we learn a fingerpicking pattern to go with this.
The blues has arguably been one of the most influential genres of music in the past century. The chants, spirituals, and songs of African-American slaves in the 19th century gave birth to the genre, while descendants of slaves carried their legacy into recorded form in the early 1900s.

Fred McDowell: Mississippi Delta Blues Singer
When people think of the blues, they typically think of a man or woman with a raspy voice singing and playing along with a guitar. While this is a common expression of the blues, it’s not unlikely that in the early to mid 20th century people would sing and play the blues on their ukulele too.
In this lesson, we’re going to take a look at one of the most popular chord progressions in traditional blues music known as the 12-bar blues. The blues are characterized by simplicity, repetition, rhythm, and pure emotion.
12-Bar Blues Video Lesson
In this video lesson, I show you some examples of the 12-bar blues on ukulele.
Feel free to watch this video first, but you may want to keep reading first to understand how the 12-bar blues is structured.
12-Bar Blues Form & Structure
Before we learn any fingerpicking patterns, we need to understand the structure of the 12-bar blues.
As you probably guessed, the 12-bar blues is made up of twelve bars or measures. Each measure gets four beats. Once you complete these twelve bars, you repeat the entire form.
There are three chords commonly used in this pattern: I7, IV7, V7.
The chords above are expressed in roman numerals. The “7” next to the roman numerals represent that the chord is a dominant 7th chord. The first four measures of the 12-bar blues are played over the tonic chord I7. This means, if we were playing in the key of A, our I7 chord would be A7, if we were playing in key of D, our I7 chord would be D7, and so on.
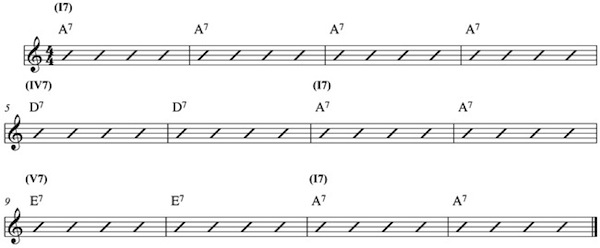
The first four measures of the 12-bar blues is played of a I7 chord. For this lesson, we will play in the key of A, so our I7 chord is going to be A7 (click to view the finger position for this chord).

For the next four measures, we are going to switch to a IV7 chord for two bars and then switch back to a I7 for two bars. Again, our I7 chord is A7. Our IV7 chord in the key of A would be D7.

For the last four measures, we are going to switch to a V7 chord for two bars and then resolve back to a I7 for the last two measures. Our V7 chord in the key of A would be E7.

Let’s Put It All Together
If we put all this together, our basic 12-bar blues structure looks like this.

As you can see, the structure is pretty simple. We can create a little bit more interest in this progression by using some variations.
12-Bar Blues Variations
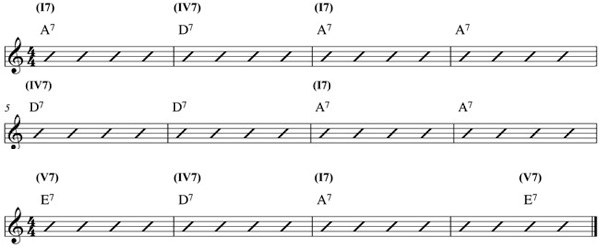
The first variation is in the first four bars. To break up the monotony of the I7, we can use a IV7 chord in the second measure.
The second variation is in the last four bars. For the ninth measure, we will still use the V7 chord, but in the tenth measure, we will switch back to a IV7 chord. In the eleventh measure, we will go back to a I7 chord, and then on the 3rd beat of the last measure, we will switch to the V7 chord.
The V7 chord in the last measure really helps the 12-bar progression to keep on going. This is because whenever you play a V7 (or any V chord) it wants to resolve back to the I chord.
This variation is used for the majority of blues progressions. Here’s what this looks like:

Give it a try yourself and let me know how it’s going for you in the comments. Stay tuned because in the next lesson we’re going to take a look at some blues fingerpicking patterns!

