Barre chords can be the hardest kinds of chords to get down on the ukulele, but if you are able to play them, you unlock a whole new selection of chord variations and positions to choose from to add variety to those same old, boring chord progressions.
In this lesson, I give you some tips for your consideration that can help you play barre chords more cleanly and easily on the ukulele.
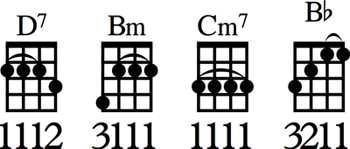
Incase you’re unfamiliar, when you play a barre chord, you are required to use a finger to fret or press down on multiple strings. Common examples of barre chords include: D7, Bm, Cm7 and Bb, as shown in the following diagrams.
Barre chords can be quite hard to switch to and fret, but give these quick tips a try to conquer these chords and open up some new possibilities in your ukulele playing.
1. Check your thumb position.
A barre chord requires a bit more strength since you are pressing down multiple strings against the fretboard. To get the most leverage, ensure that the ball of your thumb is pressed firmly into the neck of the ukulele.
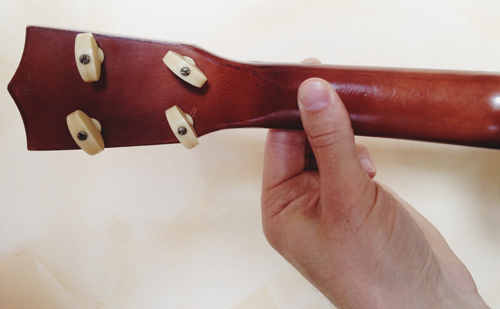
Use the ball of your thumb to press into the neck of the ukulele when playing a barre chord
2. Get closer to the fret.
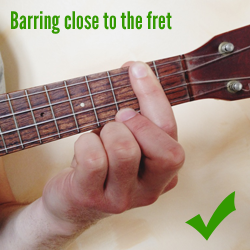
Aim to press down as close to right behind the fret as possible – almost as if you are pressing right down on the fret. Avoid barring way behind the fret. You’re able to hold down the strings easier the closer your fingers are to the fret. See what I mean as I play a D7 chord in the following images.
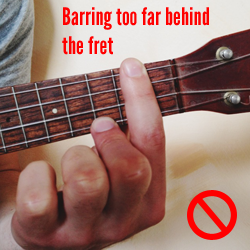
In the figure on the right, it might seem as if the strings wouldn’t ring out clearly with my index finger that close on the fret, but I’ve positioned my finger so I maximize the leverage against the strings and get every string to ring out clearly.
3. Skip the half barre and use a full barre.
Some chords like Bb only require a half barre to play the chord, where your only barring the bottom two strings rather than all four on a fret. It can be hard to get the pressure you need with a half barre, so consider using a full barre instead. I show an example of this specifically for the Bb chord in this lesson here.
4. Double up your barre.
This isn’t always a feasible option, but in some cases, it can be helpful to lay your middle finger behind your index finger as you barre the strings. This makes your barre stronger and can allow the strings to ring out more clearly. This really only works for minor and minor 7th barre chords though (like Bm7, Cm7, C#m7).
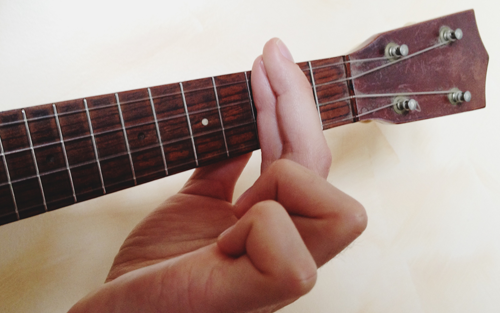
Using both index and middle fingers to barre a Cm7 chord on the ukulele
5. Isolate dead notes and adjust.
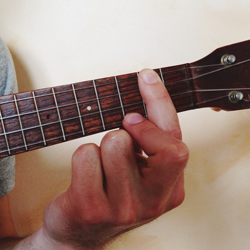
If you can’t get a barre chord to ring out, hold down the chord and pluck each individual string to see which note or notes aren’t ringing out. From there, experiment with adjusting the position of your barre on the strings. For example, to play some barre chords, you might focus on barring the strings with the bottom two knuckles of your finger, where you have a bit more meat and flesh to press down on the strings, rather than using the top two knuckles to barre the strings. The key is to be aware of these nuances, experiment and see what works best for you.
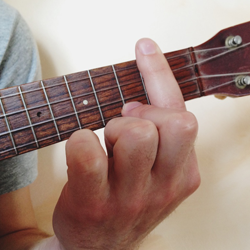
The following two images show me playing a D7 barre chord but I’m experimenting with the position of the barre using different knuckles on my finger to hold down the strings.
6. Find an alternate position.
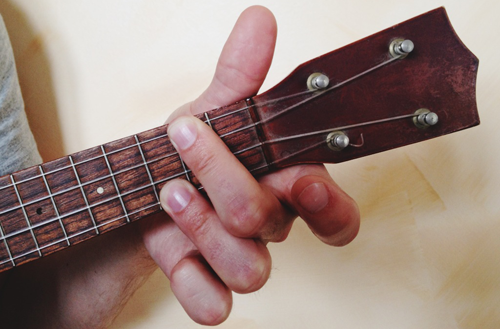
Typically, on the ukulele, you perform a barre with your index finger. However, you might find that using your middle finger works better in the context of certain chord progressions. For example, to play a D7 chord, I often like to use my middle finger to barre the 2nd fret and press down my ring finger on the 3rd fret of the bottom string, as shown in the following image.
7. Build strength with simple exercises.
If you’re finding that you’re still not able to get the hang of barre chords, be patient with yourself, because it takes a fair degree of strength in your fretting hand to hold down a barre. With time and practice, you find that playing barre chords is easier.
To help build strength, when you’re not playing the ukulele, you might take a tennis ball and practice squeezing it with a high degree of pressure for a few seconds and then relaxing. Repeat this a few times. It might seem like a pretty basic exercise, but it can certainly help you build strength in your fretting hand.
Remember: The key in all of this is to practice and experiment. It takes time and a lot of trial and error to play barre chords cleanly and smoothly. Some of these barre chords are downright awful to play, so be patient with yourself and keep at it.
What steps have you taken to improve your barre chords? What tips do you have for beginners who are struggling with barre chords? Let’s hear it! Post your comment below.
Hey Brett:
Clyde here from New Orleans,
Can I assume that these lessons on barre chords can work on any type of ukulele even the baritone?
Thanks
Clyde Ortego
Most definitely, Clyde! These same barre chord tips can be applied to the baritone ukulele. Enjoy.
Brett,
Once again, thanks. Looks like there are other Baritone uke players out there. I thought I was all alone. Dave.
Your new book—Dummies—is great. Congratulations! It’s a terrific book. Thank you, Brett.
I’m interested in finger-pickin’. I’ve been helped a lot by Ukulele Tricks. Very helpful. The pickin’ exercises in your new book are perfect, but my eyes find them hard to read. The print-size is much too small. My suggestion: Pick out the key points, the most important parts, and put ihem on Ukulele Tricks in BIG PRINT. If you did that, it would make my job as a learner much easier.
The way you presented Barre Chords in Ukulele Tricks recently is what I’m talking about. That info is in large print, some of it bold! EZ to read. That’s the ticket.
Brett! Thank you SO much. The summer “homework” given to us by the uke jam group that I attend was all about barre chords. Barre chords have been the bane of my uke existence and being self taught I absolutely could not figure out how the heck they were made. So…I open my email this afternoon and Voila! Barre chords compliments of Brett McQueen. Thank you, thank you. Now I can work at doing the barre with a lot of knowledge as to how to do it. 🙂
Sarah
This is way above my level of play. I use the alternate D7 and because of your lesson today I now know Cm7..doubled fingered!
THANKS, i learned something today! I’M A SENIOR so this is important to me!!
Thank you Brett…you are very generous with your tips, AND THEY HELP A LOT!
Appreciate you…..glad I tuned in and bought your book.
Cheers!
These tips, unfortunately, have only helped with one of the chords mentioned (D7), which is helpful nonetheless. My short and wide fingers and wide hand cause all sorts of problems with a variety of chords, like E and B (which is the same as B flat, just further down the neck), previously to make those and some other chords work I used my thumb to cover the furthest strings (except for B and B flat now) but in doing so I need to totally adjust my grip and arm placement to jump to other chords in many instances (from D to A minor is okay though). Using a full barre isn’t an option with some chords as placing a short finger that far across the neck isn’t physically possible with an index finger layed flat. I will persevere and will keep watching as more tips turn up. Thanks for earlier very helpful tips – especially the finger picking stuff.
Thanks for the new information. Your tricks and books make playing the uke much enjoyable.
Thanks! Keep up the good work. I enjoy your postings and web site.
Double finger is a simple but great option! Thanks
Thanks for posting the tip about doubling up fingers for certain barres. I stumbled on this technique on my own but always thought it was sort of “cheating.” It really does work great though, and I am glad to see you endorse it. Thanks for helping me get beyond the guilt!
Although I am a newbie I have found a way to play the B in a standard configuration. I was struggling unbelievably, like many do, with this chord. I saw a video online of a guitar player giving some instruction on barre. He suggested that instead of using the meat part of your finger, that you roll your finger somewhat and use almost the side of it where it is more bony and less fleshy. For instance, if you were trying to fret the B and looking at the tip of your index finger, roll it slightly counter-clockwise so that you are almost using the side of your finger that is nearest your thumb. When you do that, not only is the surface of the finger less meaty and flexible, but you take the bend of the joint out of play. It helped me immensely. I hope it helps someone out there as well.
I use this technique for D7 but I can’t quite get the right position for B7. Also, the top knuckle of my thumb is double jointed which makes pressing hard an issue because it just bends away. I’m going to have to get stronger in the fret hand.
I lost part of my left index finger. Can I take up Ukulele using bar chords only?
Hi Jeff, indeed, if you are determined enough, you can learn to play ukulele using only barre chords.
Brett,
Thank you for the helpful tips! The barre chord tips were just what I needed and sounding better everyday!
I am geaching approx 25 3/4 graders how to play ukulele – and I don’t even play one myself. We have done C, C7 F, G7 and Bb. I hate those barre chords – and I figure your helps will help me which will in turn help the kids. Some of the kids are bit ‘little’ when it comes to this, but in some cases, those little fingers make it look easier than my 64 year old fingers – know what I mean? ha thanks for your helps.
That sounds like a fun challenge! Hah, you are right. Sometimes the smaller fingers can be of an advantage for certain chords.
Note isolation is a fantastic tip, highly recommended for anyone starting to learn barre chords. Great collection of tips. Perseverance is the key.
Ugh I’ve been trying forever to get these barre chords! At the moment my left index finger is red raw after playing for so long. I had no clue how to go about these chords and these tips are awesome. Still having trouble though. I can’t seem to get enough pressure and I’m just muting the notes, it’s so frustrating! I’m sure I’ll figure it out soon enough, I’ll definitely try to work up the strength in my left hand so I can get more pressure.
Thanks so much for your generous and extremely helpful tips. 🙂
Hi Mel, it all takes time and practice. Be sure to give your index finger a little rest to heal up and build some calluses. It’ll toughen up eventually.
A note from my husband George: “Barre chords become much easier if the action is not set too high. The action, height of the string off the neck, determines how hard or easy it will be to get the string to meet the fret/neck. If you have to press really hard, your action is probably too high. A guitar repair person, luthier, or someone with hand tool skills can easily make a lowering adjustment to the bridge saddle, that thin piece that the strings rest on. String action is usually set pretty high at the factory. You do have to be very careful, to not over adjust. Here’s the directions: Loosen the strings and remove them from the bridge only. Rubber band or tape them together temporarily. With the strings removed, take out the saddle and carefully sand the bottom by rubbing it across a piece of 120 grit sandpaper taped to a flat surface. Go slowly and check repeatedly to feel the results with the strings back in place. A little distance can make a lot of difference. The nut can also be adjusted, but that takes special files and is better to leave to an experienced repair person.”
Thanks Rose and to your husband George for sharing a comment about the action. This is a good point to consider.
Boo Hoo – nobody but me seems to suffer from my problem! Mine is my little finger (or pinky). When barring the bottom three strings eg for a Bm, I find it so difficult to reach the G string, without interfering with the C string. The top joint of my little finger refuses to ‘arch’ or bend how I need it to. I also have a bendy forefinger which refuses to lie flat across four strings, except when not pressing any other strings at all. As soon as I add any extra strings, the fleshy part of my forefinger comes away from the A string and I get a buzz. With chords such as Alt G – where you need to bar all strings on 4th fret, I get round the problem by only barring the bottom three strings – no need to barr them all as the others are covered by other fingers anyway! (but then I still have the non-arching problem with my stubborn pinky! ) However, after much practice, I do think my pinky IS actually beginning to bend a fraction more than it used to!). The problem with only barring three strings, where you should ideally be barring four, is that it makes it harder to hold the position and slide to another Alt chord (eg Alt G to Alt A). However, I have experimented with every finger position imaginable and have decided this is the only way forward for a person with me with double-jointed fingers! Anybody else got my problem??!
I have always avoided barre chords because I had so much trouble playing them. Your tips really helped! I find that the middle finger works much better for the D7 chord, and it also makes the finger changes easier in the blues progression A7 – D7 – E7.
A couple more tips that I found really useful when I was getting to grips with barre chords…
First one is to rotate the barring finger backwards slightly (towards the nut). It reduces the pressure needed to fret the notes without buzzing.
The second one is to only hold the barre when you actually need to. Your fingers will ache a lot when you first start and a lot of that is due to the length of time that you’re holding the barre for. When you’re not strumming there’s no need to keep that pressure up, so ease off when you get chance and give your fingers a break!