Today, let’s jam out and strum this beginner-friendly ukulele chord progression.
Playing with others is one of the best ways to learn how to keep a steady strumming rhythm and stay on track with your chord changes, so I’ll keep a rock-steady strumming rhythm going so you can play along.
In this video, I give you three beginner ukulele chords and a familiar beginner-friendly strumming pattern that we’ll use to jam out and play along together.
Grab your ukulele, tune it up, and let’s begin!
Keep reading to discover the chords and strumming pattern used in this video.
Chords You Need to Know to Play This Jam
There’s just three beginner-friendly chords you need to know to play along with me. These chords are perfect chords to practice at tempo since they are used in many, many songs. After jamming today, you’ll be making these changes smooth and steady.
C Major Chord
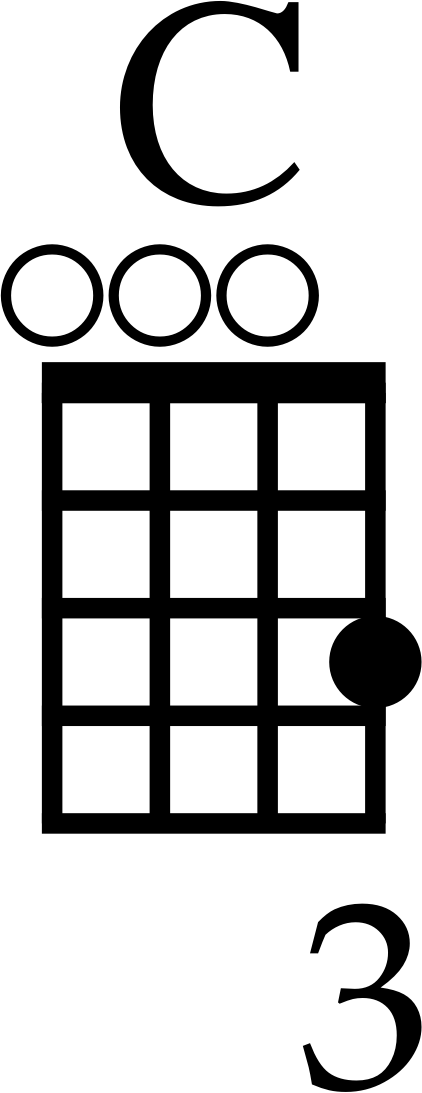
To play a C major chord, place the ring finger on the 3rd fret of the bottom A-string and let the top three strings ring open.
F Major Chord
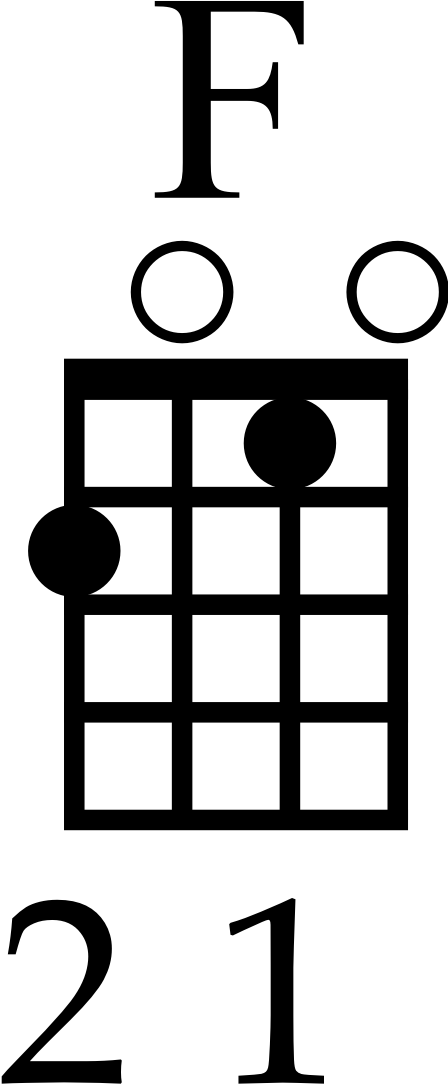
To play an F major chord, place the middle finger on the 2nd fret of the top g-string and the index finger on the 1st fret of the E-string. Let the C-string and bottom A-string ring open.
G Major Chord
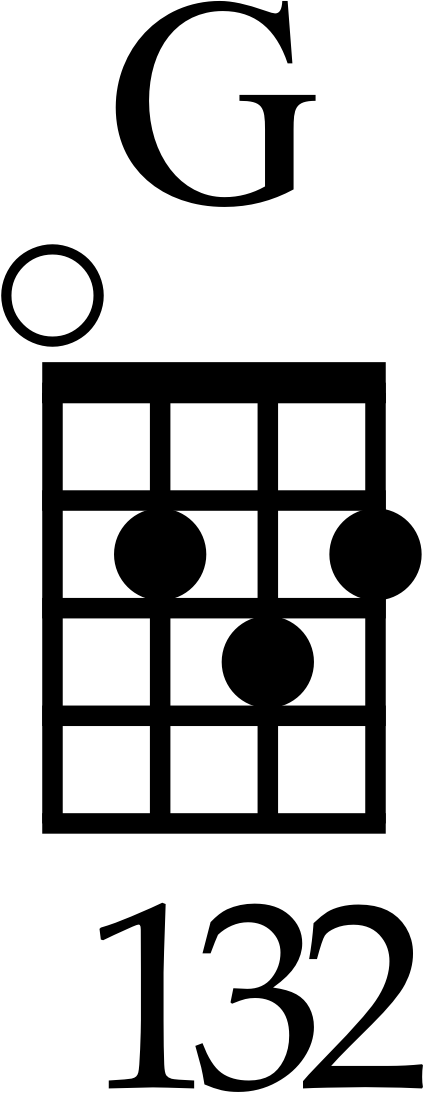
To play a G major chord, place the index finger on the 2nd fret of the C-string, ring finger on the 3rd fret of the E-string, and middle finger on the 2nd fret of the bottom A-string. Let the top g-string ring open.
Strumming Pattern You Need to Know to Play This Jam
For our jam, we’ll be playing a beginner-friendly calypso strumming pattern.
This strumming pattern is commonly used in songs with chord changes that occur on the first beat of the measure, and it’s also a popular pattern used in Hawaiian ukulele music, so it’s definitely one you need to learn.
Playing the Chord Progression Together
For this jam, we’re going to keep things nice and simple.
We’re going to repeat a four-bar chord progression. On the first beat of every measure, we will change chords. Make sure you count out loud as you’re first learning how to make these changes.
When you’re ready, queue up the video above and I’ll hold down a steady strumming rhythm so you can play along and practice these changes!
Hi Bret,
This is not related to this jam session but I wonder if you could give me any tips on changing chords more quickly and smoothly between A to E to B? I’m trying to master Photograph by Ed Sheeran.
Thanks,
Mark.
Hey Mark, making smooth chord changes is a big topic in my course Strumming Tricks, which I can definitely recommend, but here’s a couple things I would think about:
1. The key of E is one of the hardest ukulele keys to perform in, but it’s a common key in guitar music because the key of E is much easier on the guitar. Ed Sheeran writes a lot of songs using E guitar shapes, so whenever I think about adapting one of his songs to ukulele, my first thought is always, how can I get this transposed to a ukulele-friendly key? For example, you could transpose this song down from the key of E down to D major, which would give you:
E = D
A = G
B = A
I have a free lesson on transposing here.
2. Whenever you come across a challenging chord progression, you want to really think about implementing the main ideas behind the Hover Technique. It’s too much to post here but again I cover the ideas behind this and the application of it in my full course. The main idea is to think about alternative finger positions for chords to make the chords easier to switch between. It might even mean exploring alternative chord variations, like seeing if there’s an easier variation in the Ukulele Tricks Chord Library.
Hope this can give you some ideas! My main thing would be don’t be afraid to transpose the key of a more ukulele-friendly key to play the song. You can’t go wrong with that!
Thank Brett. Great fun to jam along with you. I found it a tad too fast but I will practise! More videos like this would be good with different chord progressions and different strumming patterns perhaps. Always enjoy your clear, calm teaching style. Best wishes.
That’s good feedback for me, Lisa, thanks! I’ll definitely work on more play-along chord progressions that are similar in style. While you practice up to my speed in this video, you might try clicking the video and going over to YouTube where you can slow down the video player to like 0.75. This can be a way to slow me down 🙂
Love it. ……… Great idea
Thanks for watching, Tom! Glad you dig this kind of video.
Isn’t the G chord 232?
Margot, the chord diagram numbering code for G is 0232, but the fretting hand fingering numbering (below the chord diagram) is 132, indicating to use the index finger, ring finger, and middle finger. Hope this helps provide clarity!
Wow . . . Thank you.
I’ve bought your book but it looks like I need to be signing up to some of your courses.
Thanks Brett and have a great day.
Mark.
Glad I could help, Mark!
Thanks, Brett. Slowing the video to .75 helped. You sound like you’ve had a small dose of Nyquil, but now my fingers can keep up.
Haha, that’s hilarious!
Strumming along is a fun way to learn. More videos like this different chord progressions and different strumming patterns would be much appreciated.
That’s good for me to know, Lara! Thanks and glad you enjoyed this video!
Thanks Brett,
Jamming with you helps me perfect chord progressions and timing. You do really well relating to beginners ! : )
Awesome, Billie! I’m happy to hear that! Thanks for your comment.
Very helpful. I’ve been taking your courses for about a year now, and will look for more of this with different easy chords and strumming patterns.
It’s so good to have you in the course, Tim! Hope to do more of these kinds of videos again. Glad to hear you like this one.
Thanks for this. One thought, you might want to consider adding in a “bouncing ball” type marker at the chord change since the audio can get a bit drowned out.
Thanks for the comment, Maggie!
I am enjoying your Ukulele tricks course very much and following along with your videos, including this progression.
Question for you – your diagram for the G major chord shows 1 3 2 for the C E A strings. I find it much easier to play that chord as 2 3 1 for the C E A strings, and the chord rings out much clearer for me. In some of your other videos you have shown alternate ways to play some chords. Can you foresee any future problems with chord changes by playing the G chord this way?
Hey Ken, I know some people who play that shape in that way, but for me, I’ve never been able to make it work with my fingers. That’s great you can! The main challenge with this shape might be if you need to reach your little finger to the top g-string for more elaborate kinds of solo fingerpicking songs, but for standard strumming chords, I view it as an acceptable variation.
just what i needed, thank you. A good confidence builder !
Good to hear, Tom!
I loved trying to keep up with you. Then, because I’m alone at home jamming I went a whole different direction for a bit. That was fun, but I lost the rhythm. Luckily you kept smiling and repeating the pattern so I could join in again.
One of my favorite moments in learning with you in your Strumming Tricks class, you and I played Twinkle Twinkle Little Star together. When I finished playing this song with you, the music faded and you looked up and smiled. I laughed and felt great. It seemed like a real moment between people even though I was live and you were recorded.
Thanks for these videos. They are great fun help.
That’s so cool, Elisa! It’s funny sometimes recording videos but I like to imagine we are just playing along together in the room together. I love the moments of laughter that come up in music, sometimes unexpected. Thanks for sharing this with me and glad you had fun jamming along to this progression with me!
hi Brett, thanks so much. Im really loving the singalongs, struggling a bit still changing chords to a G but yep like Lisa said, ill just practise more. love to see more of them, cheers
I’m glad to hear that, Anita! Keep working on that G chord – it’s definitely the trickier part of this chord progression. Thanks for your comment!
I enjoyed that bit of practice, it’s definitely more fun doing it with someone else other than on your own.
Any hints to make the following chord progression easier:
C#m, G, C#m, G, C, Bm, A
I’ve been practicing and practicing but getting that stretch from the little finger on the 4th fret up to the index & 3rd finger on the first fret doesn’t seem to get any easier, even when I bar the G & C strings on the first fret with my index finger.
I play on a soprano ukulele, it must be even harder on a concert or tenor!!
Hey Mandy! Is that progression from a specific song? Normally, those chords won’t be played in a song progression together since they belong in different keys relative to each other (typically speaking). C#m and Bm share the same finger position, just played on a different fret, so I would highly recommend checking out this recent video I did on overcoming the Bm chord. In that video, I discuss some tips, tricks and variations for performing that barre shape. I think it might help address some of your question!
Great pace! And it sounded good also. Keep making these kinds of videos. Maybe include familiar songs that we can sing along to. I love your teaching style and enthusiasm!
Awesome, Gina! Thanks for that feedback and definitely want to do more videos like this one.
I just ran across your video, a good friend of mine is bringing her ukulele over this evening and she’s going to teach me some cords, from there I’ll decide if I want to purchase a ukulele I’m just curious, do you have a particular make our model that you prefer, Also if there’s something that I should stay away from let me know. I don’t want to waste my money on something that I will be struggling with I believe having the right equipment from the beginning is the best way to start
Hey Tonya, check out this post here. Welcome to the world of ukulele playing! Hope you had a good time with your friend and make the decision to get a ukulele 🙂
The strum & chords I’m familiar with & good at (“Jamaica Farewell,” one of the 1st songs I learned). The best part was the comment that led to the lesson on transposing. Good to know!! Thanks.
Awesome, Marty! Glad to help!