Welcome to the Fingerpicking Tricks Mini-Lesson Series.
My name is Brett McQueen (that's me above), and in this 3-lesson video lesson series, I teach you everything you need to start fingerpicking in multiple styles on the ukulele.
Let's begin!
In this lesson:
- Discover which fingers you use to pick the ukulele
- Learn how to position the fingers on the strings
- Take what you learn and fingerpick a simple, beginner-friendly song
Discovering Fingerpicking Technique
Before we begin, make sure your ukulele is tuned up in standard tuning and ready to go.
There are two main ways of fingerpicking the ukulele: the four-finger picking technique and the alternating thumb picking technique. In this lesson, I show you the four-finger picking technique.
As the name implies, the four-finger picking technique is a way of fingerpicking the ukulele using four fingers on your picking hand, with each finger assigned to pluck one of the four strings on the ukulele.
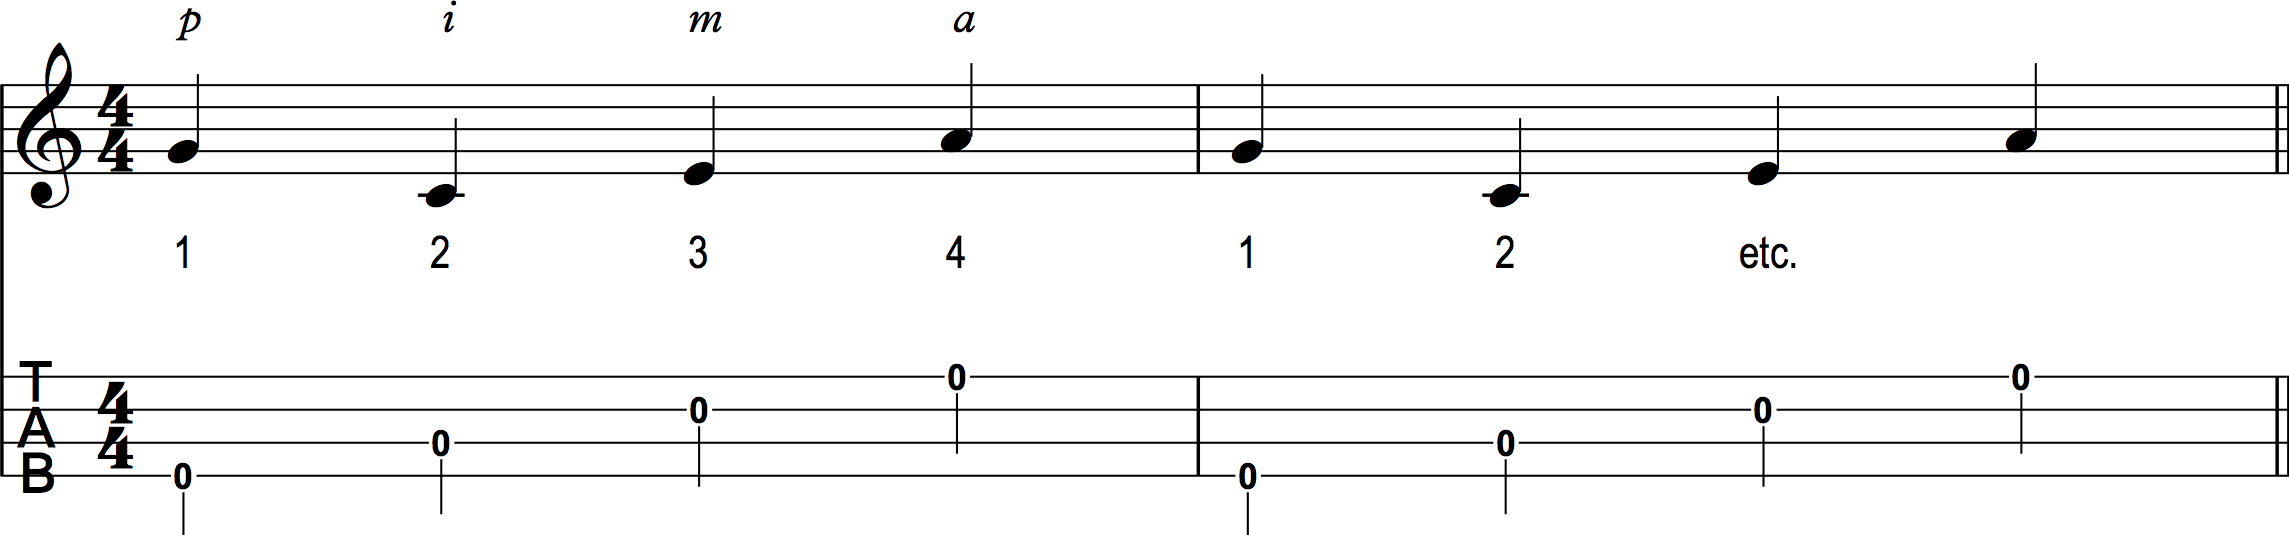
The thumb (represented by a p) is used to pluck the top g-string, index finger (represented by an i) to the C-string, middle finger (represented by an m) to the E-string, and ring finger (represented by an a) to the bottom A-string.
To practice this technique, pluck each string in succession starting with the top g-string, as shown in the following example. Don’t worry about playing a chord right now–just pluck the open strings:
Don't know how to read ukulele tab? It's easy to learn. We got you covered. Download the handout here.
The above example is counted in four, as indicated by the 4/4 time signature. Each pluck gets one count (1, 2, 3, 4, etc.).
Watch the following video lesson from the Fingerpicking Tricks online video lesson course and learn the technique:
Note: The alternating thumb technique is only covered in the full Fingerpicking Tricks online video lesson course.
In this lesson, you use the four-finger picking technique to play a song. Before looking at that, get some more tips on fingerpicking the ukulele.
5 Tips For Fingerpicking the Ukulele With Ease
1. While picking, your wrist should be straight, extending from the forearm. Your fingers should be relaxed and bent slightly, as if you were lightly holding an imaginary golf ball in your hand. Aim to pluck the strings where the nail and flesh of the tip of your finger meet.
2. Make it your goal to make each string ring out with equal volume and tone. For example, the string you pluck with your thumb should not be significantly louder in volume than the string you pluck with your ring finger.
3. Take it slow at first and keep it relaxed. Any tension in your picking hand works against you in the long run slowing you down and making your picking less accurate. Remember, it only takes a little bit of contact with the tips of your fingers to produce a sound from the strings. Think about just grazing or "kissing" the strings with the tips of your fingers.
4. If you’re new to fingerpicking, be patient. It takes time for your fingers to build up independence from one another and get used to the motion of picking the ukulele. Don’t be discouraged; you can do it!
5. You aren’t required to grow out your nails to successfully fingerpick the ukulele. Longer nails produce a brighter tone and attack, while shorter nails produce a warmer, darker sound. The length of your nails comes down to personal preference. I prefer to keep the nails on the fingers of my picking hand just a few millimeters long past the flesh of the fingertip.
Learn Your First Fingerpicking Song
Let’s start making music!
Before getting too crazy, start simple. Use the four-finger technique to fingerpick the chords for Frère Jacques.
Lucky for us, this song can be played over a C chord the entire song. Hum or sing the melody of the song as you fingerpick.
Download the sheet music and ukulele tab for Frère Jacques.
Note: In the sheet music and tab, the top line shows the melody of the vocal line you sing or hum on a music staff with the lyrics written underneath. The middle line shows another music staff with the notes that are reflected and indicated in the ukulele tab on the bottom line.
Again, work on making your picking as even as possible. Each string should ring out in similar volume and tone as the other strings.
Your Lesson 1 Practice Objectives
Great work this lesson! That wasn't so bad was it?
I will send you the next lesson soon. Until then, practice the following:
- Practice the four-finger picking technique making your picking sound even through the entire pattern.
- Try the four-finger picking technique over alternative chords, such as Am, F, and G7. Search and discover new chords in the Ukulele Tricks Chord Library.
- Learn how to play Frère Jacques.
To see the most progress in your playing, I recommend practicing at least 15 minutes per day this week. If you want to see improvement, hours upon hours of treacherous practice isn't required, but it is essential to put in the practice!
Join the Discussion
How's this lesson going for you? Post your comment or question below.